
Nested Components in Angular 11
In this tutorial we will discuss nested components in angular 11 with an example.
As we already know Angular 2 is all about components. A component in Angular allows us to create a reusable UI widget. A component can be used by any other component.
The point that you need to keep in mind is, putting all the features in one component is not a great idea because when the application grows it will be very difficult to maintain as well as difficult to unit test. So what you need to do here is, you need to split the large component into a number of smaller sub-components, where each subcomponent will focus on a specific task.
What are Nested Components?
The Angular framework allows us to use a component within another component and when we do so then it is called Angular Nested Components. The outside component is called the parent component and the inner component is called the child component.
Understanding Nested Components in Angular Application:
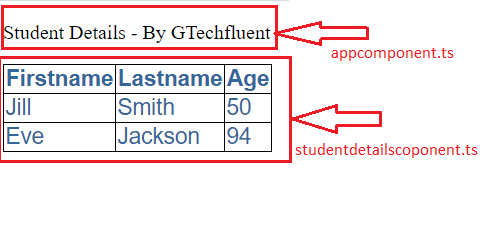
Let us discuss how to create and use a nested component in the angular application with one example. Assume that you have a component called StudentDetailsComponent and you want to use this Student Details Component inside the AppComponent which is our root component. Our requirement is that we need to display the student details as shown in the below snap.
 As per our requirement, we need two angular components one will be the parent component and another one is the child component.
AppComponent: As we already have app components created and will use as parent components.
StudentDeatilsComponent: The StudentDetailsComponent is used to display the Student details. This is our child component. As this is the child component, it should be nested inside the AppComponent i.e. parent component.
As we have discussed, a nested component is a normal component, but we use it with a parent component to communicate data between them.
Let’s look at a simple example where we will create nested components using Angular CLI and use them with a parent component.
Step 1: Creating student details component.
Open Visual Studio Code terminal and type below commad.
ng g c studentdetails
Once you type the above command and press the enter button, then it will create a folder called student within the app folder with four files as shown in the below snap.
Step 2: Modifying studentdetails.component.html file:
This file is going to contain the HTML for the student details component. So, open the studentdetails.component.html file and then copy and paste the following HTML code in it.
<table style="width:100%">
  <tr>
    <th>Firstname</th>
    <th>Lastname</th>
    <th>Age</th>
  </tr>
  <tr>
    <td>Jill</td>
    <td>Smith</td>
    <td>50</td>
  </tr>
  <tr>
    <td>Eve</td>
    <td>Jackson</td>
    <td>94</td>
  </tr>
</table>
Lets add some css to apply look and feel for table
table {
    color: #369;
    font-family: Arial, Helvetica, sans-serif;
    font-size:large;
    border-collapse: collapse;
}

td,th {
    border: 1px solid black;
}
Step 3: Modifying app.component.ts file:
Open your parent component i.e. “app.component.ts” file and then include “app-student” as a directive as shown in the below image. If you remember, the “app-student” that we used here is nothing but a selector of StudentDetailsComponent i.e. our child component
At this point, launch the browser developer’s tools and click on the “Elements” tab and notice and directives are rendered as HTML tag as shown in the below image. Here, you can see the app-student render inside the app-root tag.
In this tutorial, we have learned about nested components, why we need them, We will see how to pass data between components in our upcoming tutorial.